Recipe Management in Opto22 groov View - Part 2
In part one of this series, we configured Node-RED to communicate with a MySQL database. Then, we set up a Node-RED dashboard and inserted some records into the database.
In part two (this post) we will update the Node-RED flow to use Opto22’s groov View platform to handle our user interaction. Here we can create, update, and manage recipes, as well as select which recipe we want to run on our production line. Once we have bidirectional data integration with Node-RED, we will build out a recipe management screen in the next post. In the final post in this series, we will configure the PLC side of things to actually run the recipe once we have selected it from the groov View interface.
Configure Node-RED and groov View Communications
The first step in configuring groov View and Node-RED is to install the node-red-contrib-groov package in the Manage Palette menu. This will give you access to the read and write nodes for a bidirectional connection to groov View from Node-RED.

Once you have installed the node-red-contrib-groov package, we can begin the process of setting up a link to groov View.
First drag a “groov read” node on to your flow.

Double click on the node in the flow, then click the pencil (edit) icon next to the “Data Store” property to select the Groov Project we will use. Then, click the pencil icon next to it to create a new groov project. In the project node properties, enter the IP address of your groov View server, the API key for your user. If you need a certificate, enter the path to it. Once you have entered this information click “Update”. On the data-store-node you will enter the data store name. We will name ours “Recipe” and set it up in the groov View project. Click “Update” again, and enter the Tag Name. Ours is “Name” for the name of the recipe. Click “Done” to save your work.


Finally, to trigger a read, we will use an inject node. To display the tag value in the debugger, we will use a debug node.

To find the API key for the groov credentials property configuration, you can either go into groov Manage -> Accounts, then choose the user you want to connect and copy it from there. Or you can go into build mode in groov View -> Configure -> Accounts and copy it from there. Yes, the API keys are different in these screenshots, one is from a groov RIO, and the other is from a Windows server hosting groov View for this post. If you are using a groov EPIC PLC with groov View and Node-RED on the same device, they would use the same key. We are using the API Key from groov View in this configuration.


A Note About groov View Certificates
If like us, you are hosting Node-RED on a different device than groov View, you will need to install a certificate from the groov View server. In our example case we have a groov RIO running Node-RED and a Windows server hosting groov View.
On the Windows machine, you will want to run the groov SSL Certificate program to generate a certificate. Once you start the program, answer the prompts with your information to generate the certificate.


Once you have the certificate file (in our case groov.cer), you will want to install this on the groov RIO. Go into groov Manage -> Security -> Client SSL, and upload the groov.cer file there.


Once you have installed the certificate, restart Node-RED and you will be good to go.

Configure a groov View Data Store
In groov View, go into Build Mode. In the tag browser pane, select “Configure Devices and Tags” then select “Data Store” from the “Add New Device” dropdown menu.

Give the data store a name, in our example, we’ve using Recipe.

Select the newly added data store and click “Configure Tags”

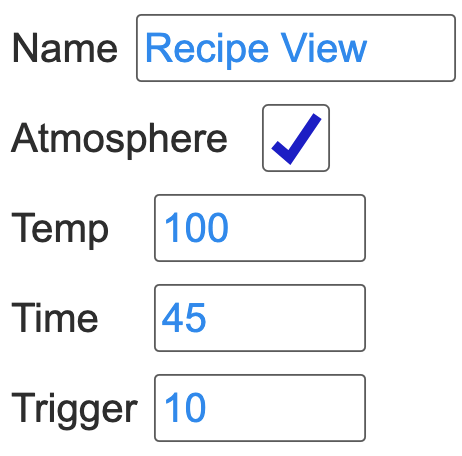
Next, we’ll add tags to the data store, and select the relevant data type. We will be adding four tags: Name, Atmosphere, Time, and Temp. These will use the following datatypes of String, Boolean, Integer, and Integer respectively.
We will also set up for tags with the “Table” checkbox selected and a table length of ten for reading in a list of recipes from the database. This will allow us to read in an array of ten values from the database. See the complete list below.


Next you can save changes.
Now, we will create a simple page to test functionality. On this page we will add a Value Input gadget, select the “Name” tag for the value, and then go into View Mode to enter a value for this tag, in this case “Recipe Name”.


Read Data from groov View into Node-RED
To test our communication integration, we will go back to Node-RED, deploy the flow. We’ll click the “Inject” button on the flow leading into our Name read node we configured earlier. Watching the debugger window, we will see our value “Recipe Name” displayed.

We can now read data into Node-RED from groov View. Now that we have this in place, we can begin to remove the Node-RED dashboard components from our flow and replace them with groov View reads. As you may recall from Part One, here is our flow using a Node-RED dashboard to populate the values:

We will now re-write this flow to use groov Read nodes and add a button we can trigger from groov View to execute the flow to write a recipe to the database.
To start, let’s add the rest of the recipe values to our groov View screen, and wire them up in Node-RED to make sure the values come across when we click the inject button.


If you have a groov EPIC or groov RIO set up, you can use the groov I/O Input Node to read in an input value either from a physical input to the device, or you can configure an MMP value groov View that can write to (and then read) this value in Node-RED to execute part of your flow.
If you don’t have a groov EPIC or groov RIO—or you want to use a polling based approach—you can also use a timer function on an inject node to periodically read your values, then trigger parts of your flow based on the values you are reading. In our tutorial here, we will keep things simple and use an MMP address in our groov RIO. However if you want more information on how to use a timer in Node-RED read this excellent forum post.
To configure an MMP address in our groov RIO, go to groov Manage then the I/O Tools menu. We will then go into the MMP Calculator. At the top of this page select “Scratch Pad - 32-bit Integer (Section 1)”.
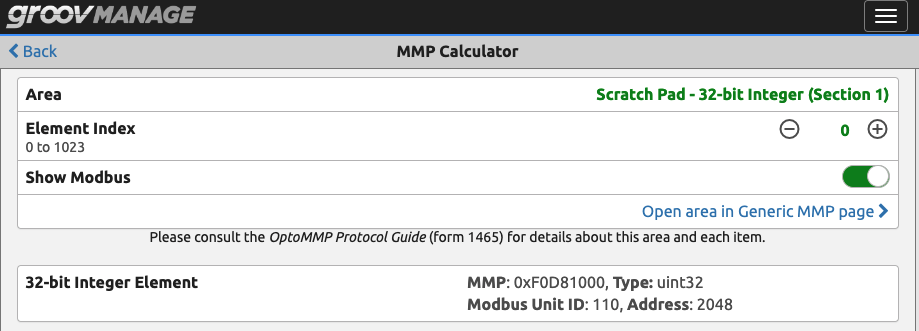
Click the “Open area in Generic MMP Page” link and you will see the addresses for each value in this MMP area. You can also look at different values if you desire, such as 8 Bit Integers and get a different address space as needed.

We will use the first address in this space for our tag to trigger a database insert in Node-RED. Copy the F0D81000 from here and go to groov View.
Go to “Configure Devices & Tags” and add in an Opto22 I/O Unit. We’ll give it a name of “MMP” and set the IP Address to that of our groov RIO.

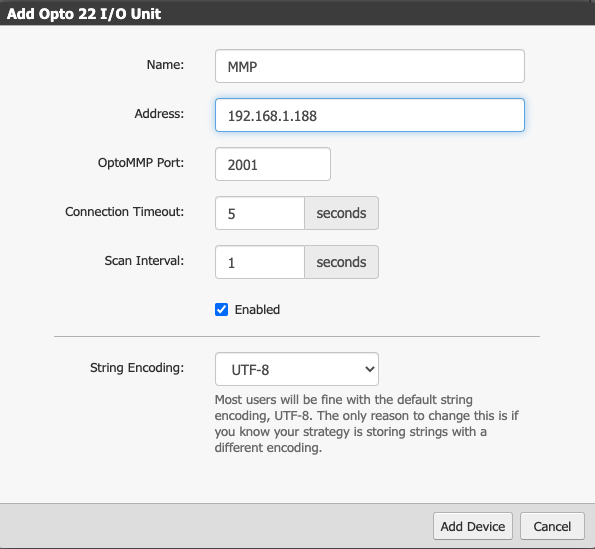
Once our Opto22 I/O Unit shows up in the device list, click on it and then click on “Configure Tags”.

Click the + button on the upper left to add a new tag. We will call it Trigger for now, and paste in the F0D81000 address we copied in from groov Manage for the offset.

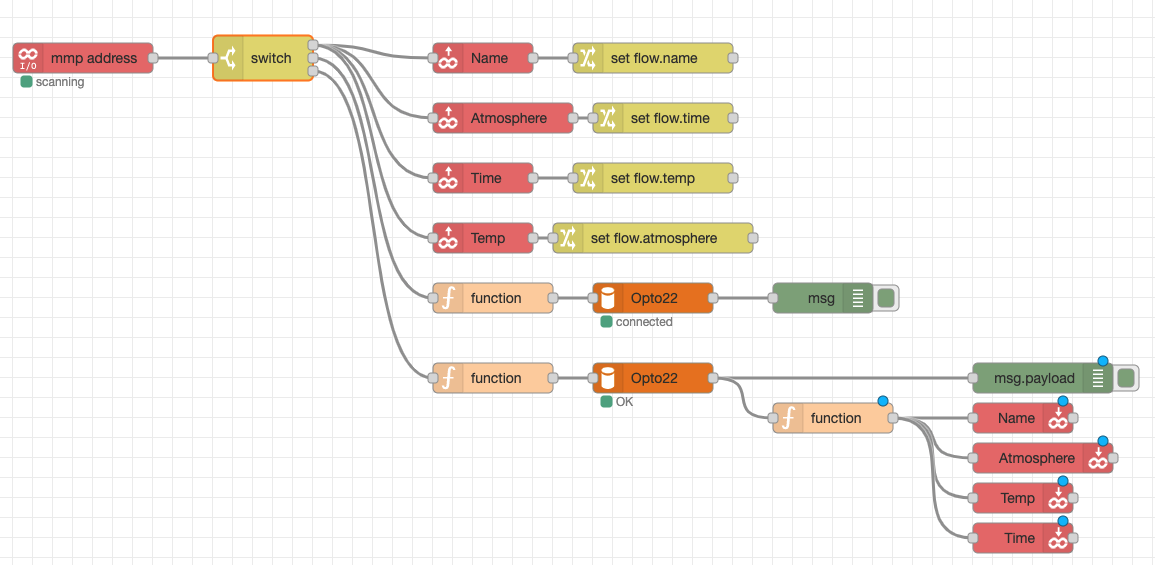
Next, go back to Node-RED and replace our inject statement with a groov I/O Input Read node and a switch statement.
Within the switch statement, we will add a rule to check if the value is equal to one. We will wire this up to the nodes to read in our four recipe tags and display their values to the debugger.
Then, we will configure the groov I/O Input Read node to look at the same F0D81000 address, this time on localhost since we are running Node-RED on the groov RIO itself.

For reference, here is the switch statement’s configuration:

These settings will trigger the output of this switch statement when the tag value at address F0D81000 is equal to 1, and will write the values of the tags from the groov read nodes to the debugger.

Node-RED debugger with data displayed after it has been read from groov View.
We can then change this value either in the MMP page or from a gadget on the screen, and when it has a value of 1 it will trigger our flow.
Insert Records Into the Database
We can now take the rest of the flow from part 1 and insert records into the database. We will combine the set value nodes with the groov read nodes, and add a second value to the switch statement to execute the database call. We can now write a value of 1 to our MMP tag to write the values to Node-RED, then a 10 to the MMP value to store them in the database.


The function and database connection are copy-pasted from the button action in part 1.

Writing a value of 1 to our trigger tag will update the flow values, then writing a value of 10 will trigger the database insert and add a row to the table.


Write Data to groov View from Node-RED
We can repurpose the SELECT statement from the previous post to write data back to groov View. We’ll take the function containing the SELECT query and the database connection node from before. For this post, we will hardcode the value of the ID to select a specific record from the database. We will make this dynamic in the next post (part three) when we work through the recipe management interface.


After the database connection node, we will add a second function node to map the tag values in the msg object. Then we will pass those to the groov Write nodes.

The groov Write nodes will be configured similarly to the groov Read nodes from earlier.

Finally, we will add another case to our switch statement. It will go below the other rules for ease of adding it to our existing flow. It will execute the SELECT query and groov Write nodes when the value of the MMP tag is 2.

Here is the final flow with the groov Reads, INSERT query, and SELECT query all tied into the switch statement:
Below is the data we pull from the database shown in our groov View screen:

Wrapping Up
You can now use groov View to read and write recipe data to/from a database and to/from data store tags when integrated with Node-RED. Yes, it is a more involved process than using an Ignition gateway along with system.db function calls in a script, however this gives us a huge amount of flexibility when working with Opto22 hardware because we can use their built-in groov View software which is free on a groov EPIC processor.
These simple types of solutions are popping up more and more, and we have plenty of interesting ideas on the horizon for projects where Opto22’s platforms will be a tremendously powerful tool in our arsenal.
If you have any ideas or needs we can help you solve with Opto22, Node-RED, and groov View please let us know!