Ignition 101 - Time of Day Based Triggers
In many projects, you will find a need to do something at a specific time each day. For example, in water/wastewater treatment, this task might be storing the previous day’s total flows for a report. At a heat treatment facility, they may need to pre-heat a furnace for an hour before starting production. Or a project may simply need to trigger a popup to alert operators at a specific time each day.
We typically set up these triggers with a timestamp tag and a tag change script. Based on the times of day we need to account for, we will add if statements and execute the code we need at that specific time of day.
Configuring the Tags
First, we need to configure a tag to generate the time of day. You can use the built-in [System]Gateway/CurrentDateTime tag if you like. This tag will change every second of the day. This works well—if you need something that triggers based on seconds. However, most use cases only require the hour or half hour. Based on that assumption, choosing a tag that only updates every minute is sufficient. If we only cared about what happens on the hour, we could simplify by additional level and only pull out the hour of the day.
To most easily accomplish this task, we will set up an expression memory tag. In our example, we will put it in the [default] tag provider, however you can put it wherever makes the most sense for your project.
We will call this tag “Timestamp” and set it to an integer type. We will then use the following expression:

(getHour24(now())*100)+getMinute(now())
The above expression will give use a number between 0 and 2359, indicating the current timestamp as an integer value. For example, 30 would be 12:30AM, 800 would be 8:00AM, 1315 would be 1:15PM, and 2359 would be 11:59PM.
We can then trigger various conditions based on the value of this tag throughout the day.
If you wanted to include seconds, you would change the multiplier on the hours to 1000, add a multiplier of 100 to the minutes, and add a getSecond(now()) call to the end of the expression. If you only needed the hours you could just use a getHour24(now()) call by itself.
Using the expression above will give us a tag with a new value every minute.
Setting Up the Tag Change Script
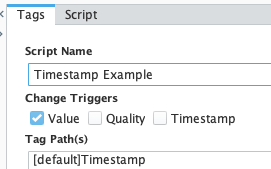
Next, we will navigate to the Scripting->Gateway Events node in the project tree and add a new Tag Change Script. When possible, we prefer to collect our tag change events in the Gateway Events so that they are all in one place. If you are using UDTs or need to have the scripts accessible outside of a given project, you can configure Tag Change scripts on the tags directly. However this can cause hassles if you need to find where a particular value is being set—you will need to look through all of your tags to see where that script is configured!
We will create a tag change script, give it a name, and add our tag path to the list of tags. We will also uncheck Quality and Timestamp as we are only concerned about when the value of the tag changes:
We will configure the script in the script tag. As is customary for tag change scripts, we will add in a check to see if it is an initialChange. We don’t need to execute the script the first time the gateway starts up for example.

The way our system is designed, we are tracking the total flow through each of three pumps throughout the day. Every day at 7:00AM, we need to write the current total to a reporting tag for yesterday’s flow, then reset the totalizer for the new day.
In our code, we first check to make sure it isn’t an initial change. If it isn’t, we then check the value of the timestamp tag. If it is 700 we know it is 7:00AM and we can execute the code. If it isn’t 7:00AM, the script will simply stop.
Because we are reading more than one tag, we will use system.tag.readBlocking calls. This will speed up overall performance. First, we will build an array of our tag paths, then pass the array as a parameter to the system.tag.readBlocking call. This will return an array of qualified tag values we can use further in the code.
Next we will do a similar operation using a system.tag.writeBlocking call. We build up a list of our tag paths here, then the list of the values from our totalizerValues array which is holding each of our tag values. Note: it is a qualified tag value so we need to use .value to get the actual value of the tag.
Then, we pass these paths and values to a system.tag.writeBlocking call.
Finally, we will reset the totals. We will use our paths from before, make an array of all 0s, and use another system.tag.writeBlocking call. We could also consolidate the last portion of the code and do one system.tag.writeBlocking call on line 10 with the totalized paths and three 0s. We simply separated them here for clarity.
As you can see below, we have the total flow values and a value for the previous day. At 7:00AM, we will move the current value of Total Flow to Yesterday and reset the Total Flow.

Pump total values prior to moving today to yesterday and resetting today.
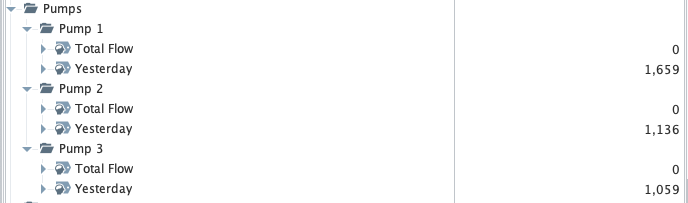
Updated pump flow total values with yesterday's value populated and today's current value zeroed out.
Logging the Activity
For situations where something will automatically happen at a particular time, it can be important to make a note in the logs about it. We can add a couple of lines of code to our script for writing a line to the logs each time the script executes.

To access the logging system, we first need to generate a logger instance. We’ll do that on line 3 using the system.util.getLogger() function. We pass in a parameter for the name of the logger we want to use. And this will be displayed in the log under the “Logger” column so we can easily find it in the logs.
To execute the logger and log an action, we call the logger.info() function on line 13. We can also use other functions to highlight errors, warnings, debug statements and more as needed. Learn more with Inductive Automation’s documentation for loggers. Next, we pass in the string we want written to the log. In this case, the string will tell us that we logged the pump totals, and inserted the values for the 3 pumps.
Below is an example log entry. Yes, the timestamp is not 7:00:00AM, this is from writing an example for this post, not a live system where this actually executed at 7:00AM so we used a memory tag and set the value too 700 to mimic the same functionality as in a production environment.

Wrapping Up
This is a very commonly implemented example of how to use scripting in Ignition to do complex tasks based on a simple input like a tag change.
People new to Ignition—or automation in general—may find that features like scripting are not usually front and center in training. Additionally, you can complete many projects in Ignition without ever having to write a script. Depending on your industry, you may never need to do any scripting. But at Corso Systems, we have found that scripting can be a very powerful tool once you are exposed to it.
Once you have written a few scripts and have seen examples of how they can be used, you will have another tool in your toolbox to solve problems. A common question in our training sessions and weekly office hours working groups is “when should I use scripting?” Usually, a first example is managing tag values based on a trigger from a PLC or operator input. Using scripting is the easiest way to accomplish this.
As we move through the current state of the world, we’re find more and more opportunities to bring people into the fold of Ignition and automation. We’re working to stay ahead of the curve of what people want to know. Having resources like this post can be very beneficial for people learning Ignition. We welcome any questions you might have and can help share our insights and experience with everyone who is working on their skills in Ignition and technology in general.
Updated 11/29/2022