PID Loops in Keyence PLCs
With the current state of the global supply chain, companies are seeking out different hardware options. The name brands like Allen Bradley and Siemens have “at least 6 month” lead times for PLCs and output cards. In reality, this usually means it is closer to 8-9 months. Even our friends over at Opto22 are currently on a 4-6 week lead time for their PLCs.
We’ve used Keyence PLCs in the past, but they keep coming up on projects recently, so we’re sharing some of our tips and tricks when working with their processors.
PID Control Loops
In manufacturing processes using PLCs, PID control loops are nearly ubiquitous. PID stands for Proportional Integral Derivative. It refers to the control algorithm implemented in nearly every PLC to maintain a process variable at a particular setpoint by changing a control variable. The Proportional Integral Derivative values themselves are adjusted while the process is running to “tune” the loop for the ideal conditions required for optimal operation.
Many PLCs offer a PID loop option, and some will even have an advanced, enhanced, or AT option for Auto Tuning the Loop. Auto Tune—when it works—is a quick and easy way to tune a PID loop. Some processes (and even some PLCs) can be difficult to auto tune, and will greatly benefit from manual tuning.
In the case of a recent project, the KV Studio PIDAT instruction was a breeze to tune. We ran auto tune once, adjusted some of the parameters to slightly reduce the overshoot, and then we were on to the next part of commissioning about 20 minutes later!
Setting Up The PID Control Loop
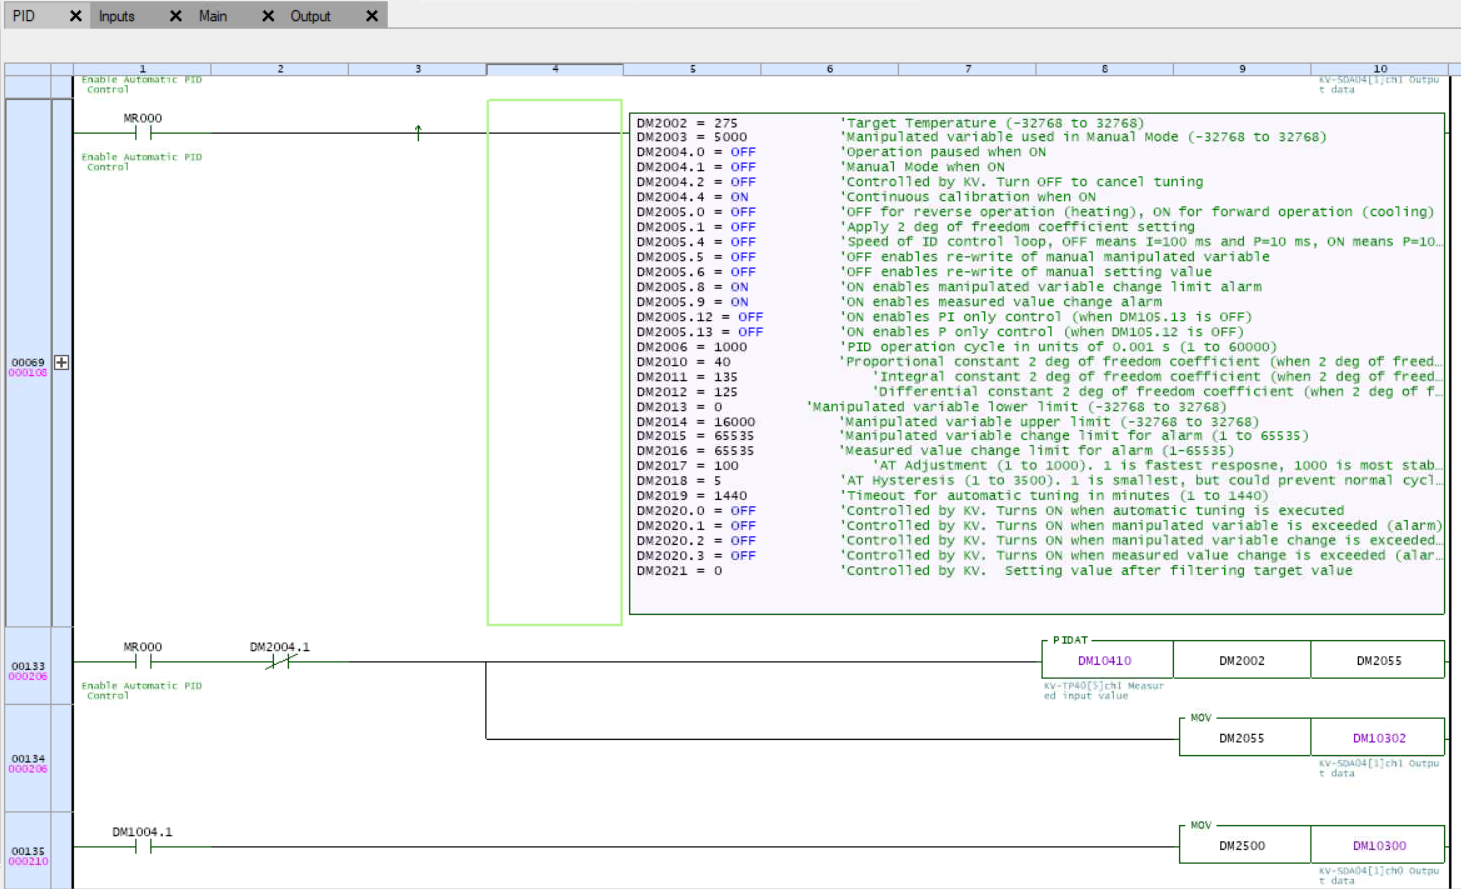
Given that most of the complexity of a PID loop is hidden from view, most PLCs only require a few rungs of logic to implement them. Keyence’s KV Studio software is no exception. All you need are three lines of code, plus a couple of buttons and numeric entry fields in the Ignition HMI to control auto tune, manual mode, and the setpoint.
The first rung uses a KVScript instruction allowing us to write nearly a couple dozen variables at one time. This is one of the killer features of the KV Studio environment. Mixing scripting and ladder logic like this is a very powerful tool. This is written on a rising edge when the MR000 value is true, so it will write these parameters once. These values will depend on your process, and you can learn all about them in the Keyence Instruction Help document.
The next rung checks to see if the PID loop is in automatic mode. If it is, it will execute the PIDAT instruction, then move the output value to the analog output channel for this loop.
The final rung handles sending a manual value to the analog output if the PIDAT loop is in manual mode.
Tuning the PID Loop
To tune this PID loop, all we needed to do was turn on DM2004.4. The PLC set the output of the PIDAT loop to 100%, back to 0%, then repeated this process twice to calculate process variables. It automatically set the values and continued normal operation.
We were seeing overshoot a little higher than we would have liked, so we bumped up the value of DM2017 from 100 to 1000, turned on DM2004.4 and ran the operation again.
It gave us different P, I, and D constants, but after a setpoint change to see what the overshoot looked like, we were done tuning the loop. Next, we tuned two other identical loops in exactly the same way at the same time.
Wrapping Up
Having fought with Allen Bradley auto tune loops on a number of projects, we were initially reluctant to use the PIDAT instruction on the Keyence PLC.
But, once we leaned in and tried it, we were blown away by how quickly and precisely it got the job done. The ease of tuning combined with the KVScript functionality, and the overall very solid—and free—tech support from Keyence is giving us more motivation than ever to start moving away from the industry standard of Allen Bradley.
We clearly don’t live in the same world as the early 2000’s when it was Allen Bradley or nothing, so to find huge wins with Keyence is pushing them to the head of the pack for the hardware we will be recommending for our customers moving forward.