MQTT Data from IoT Devices
The Perspective app with geolocation capabilities is great when you are using your phone as an operator interface—or tracking the location of peoplw who have phones in their pockets.
But, what if you need to track something in Ignition and you don’t have a phone with Perspective you can use for GPS data?
Enter the IoT
Assuming we don’t have WiFi for our device, the first step is deciding how to get data into our our Ignition Gateway. Cellular modems are a popular choice for control panels in remote locations, however we don’t necessarily want to get into the power requirements if we are tracking a shipping container, or a vehicle. Luckily for us, there are companies like Particle producing devices we can easily use for this purpose.
For the example in this post, we will be using a Boron unit from Particle. The Boron gives us LTE coverage, and allows us to send data to our Gateway. And it’s small enough to fit into just about any application we could imagine!
Light as a Feather
The Particle Boron is built in the Adafruit Feather form factor. Like Arduino, this is a form factor you can use to build just about anything—you can also add a shield, and have it work with any microcontroller using the same form factor. In this case Adafruit, has a nifty GPS Feather device we can use to provide the GPS data that the Boron will send to our gateway.
We need to add some miscellaneous hardware like a Feather Multiplier to act as the physical foundation to wire everything together, a cellular antenna, a GPS antenna, and a power supply. For our purposes we will use a USB battery to power the Boron and the GPS Feather. If you were using this project for vehicle tracking, you can find any number of 12V to 5V step down converters, and plug directly into the car’s electrical system.
Let’s Get Connected
The first step is to wire everything together. We put headers on the Feather Multiplier, and connected the TX/RX pins from the GPS Feather to the RX/TX pins on the Boron. This allowed us to use serial communication between the two units. Next, we plugged in the antennas, and the power supply.
The next step is to add an IoT network SIM card to the Boron. In this case we went with a card from AT&T and set up a basic plan to get data flowing.
There are a couple steps to flash the Boron with new firmware to use the 3rd party SIM card, as detailed here in the Particle support documentation.
Now, the Boron should connect to the cloud automatically. The next step is to set up the code on the Boron itself.
Wide Open
Since we are working with IoT devices—and paying for data—it makes the most sense to leverage the power of MQTT. Next, we set up the MQTT Engine and Distributor modules from Cirrus Link on our Ignition gateway, and installed the MQTT Library for Particle devices in the Particle IDE. In the IDE, we set up our MQTT client connection to point to our server. On the Ignition gateway, we set up our MQTT Engine namespace to look for the topic Boron/#.

In our IDE code, we published the following data using a client.publish() call:
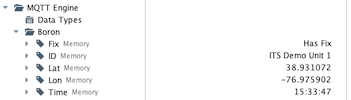
Boron/Lat
Boron/Lon
Boron/Unit ID
Boron/Fix
Boron/Time
This gives us our position, the unit ID of our tracker, reports if it has a satellite fix for the GPS unit, and the time it was last updated according to the GPS. We can lessen the data flow and take out the last two options if necessary, although they are very handy for troubleshooting.
Finally, we went into our Ignition gateway, and made sure that the data came through once we power everything up and flashed the code to the Boron.
We will dive more heavily into what we will do with this data in future articles, so stay tuned for those, and if you have any questions or would like to dig deeper into how geolocation data can help your company, please reach out!