Setting Up an Opto22 groov RIO
Once you unbox your groov RIO from Opto22, you have access to a versatile piece of hardware. You can run through the excellent documentation provided by Opto22 here, and we will take you through the process of turning it into a fully functional controller for your facility over the next few posts.
Based on your hardware and installation requirements your wiring scheme may differ, and you can use power over ethernet as well. For this post we will assume you have the RIO unit powered on, with a network connection, and a Windows-based PC available. If you don’t have a Windows-based PC you can still set everything up, you will just skip the first step.
groov RIO Find
The first step to setting up the groov RIO is to download and run the groov Find application. This will scan the network and find the RIO, giving you a link to open in a browser to get to the groov Manage page. You can download the groov Find application here. Once you download it, open it on your computer and you should see something similar to the following:

Here you can click the “Click to start groov Manage” link, or open a browser and type in the value in the Hostname column, in this case opto-04-96-27, and you will be taken to the groov Manage page.
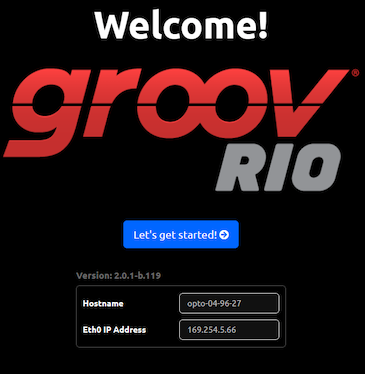
Creating a groov RIO User Account
Since this is your first time configuring the groov RIO you will need to click the “Let’s get started!” button, and it will take you to the page where you can set up your administrator account.

Once you set up an account you will be taken to the home page for the RIO, where you can access all of the functionality.

groov RIO Networking
For most people the first step will be to set up a static IP address on the RIO, but if you are using DHCP and your IT department is setting up your IP address management at the network level you are basically ready to go.
To configure networking, clcik the “System” button, then on the next page click the “Network” button.

You should see something similar to the following with the default configuration if your RIO doesn’t have a DHCP IP address assigned.

Next, on the upper right of the screen click the “Configure” link, and you will see the following page where you can set up the networking for the RIO.

Here we are using a static IP Address. You will need to verify what settings you use here with your specific network architecture. You can also use WiFi by enabling it and entering the relevant information for your wireless network.
Once you have made all of the changes simply click “Save” in the upper right corner of the page, your settings will be saved, and you can now access the RIO using the IP address you set up here.
Configuring groov RIO I/O
Finally, we will enable one of the I/O channels on the RIO. To do this, go back to the Home screen on the RIO, and click the “I/O Channels” button at the top of the page. This will take you to a listing of all of the I/O channels, which will all be disabled currently.

To configure a channel click on it on this list and you will be taken to the configuration wizard. You will see the following for whatever channel you selected, and you will need to click the “Configure” link in the upper right to set up the channel. For our purposes we will be using Channel 0 as a thermocouple input for a Type J Thermocouple which we have wired into the RIO based on the wiring diagrams in the user guide.

Once you click the “Configure” link, you will be able to select the various options for this channel, in our case selecting a Type J Thermocouple input.
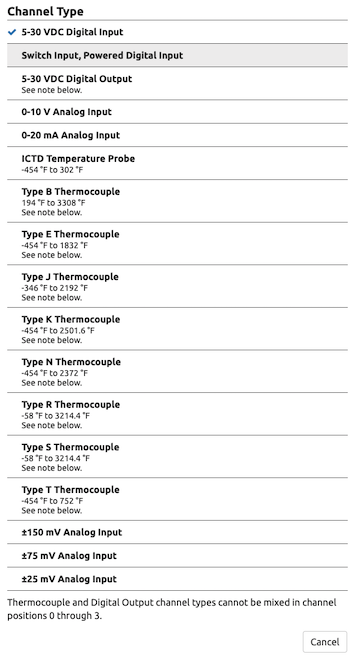
Once you select the channel type you will see another page with more options for the configuration, for a Type J Thermocouple it will look like the following.

Now that the channel is configured, you will see the value of the channel on the “I/O Channels” page, and a detailed view of the channel if you click on it.


Next Steps For Your groov RIO
Now you are ready to dig deeper into the functionality of your groov RIO! In the next post we will cover how to set up the groov RIO as an MQTT device in Ignition. Then with the end goal of using a RIO to replace a PID temperature controller at a brewery, we will configure NodeRed on the RIO for more advanced control functionality, set up PID loops on the RIO itself, set up a split time range proportional controller using NodeRed, then look into the various VPN options available on the RIO to allow for remote access into your facility, all on a single device!
Thanks for sticking around to the end, and if you have a groov RIO, any other Opto22 products, or have any questions on anything you have seen here please drop us a line!