Integrating Ignition Exchange Resources
This post comes fresh off the heels of last week’s Ignition Community Live episode, Women in Automation (replay video is below). On that webinar, Shay Johnson, a Sales Engineer at Inductive Automation talked about IA’s push to have Inductive’s Sales Engineers each release a resource on the Ignition Exchange every month.
While recently looking through the Exchange for some Alarming tools, one of Corso Systems’ Engineers found a resource Shay had released a while back, and we figured it was time to write a post about how to integrate Ignition Exchange resources into your projects. Since we also wanted to talk about Alarming and the Web Development Module this resource was a natural fit for a post!
Choosing an Ignition Exchange Resource
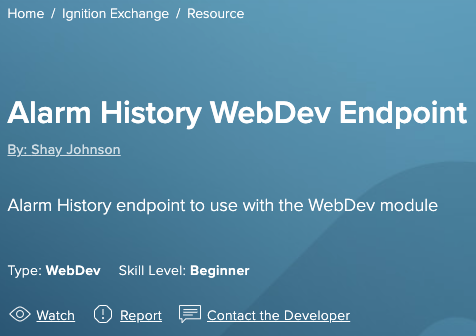
The tool we will be covering in this post is the Alarm History WebDev Endpoint.
In a nutshell, this tool wraps the system.alarm.queryJournal() function into a WebDev endpoint. This allows you to get the alarm journal information from Ignition into any system that can be called from the WebDev endpoint.
Skill Level: Beginner, Type: WebDev
By Shay Johnson
For this post, we will call the resource directly from a web browser to show what it outputs, and we will also integrate it with a 3rd party web server to get the data into a non-industrial web application.
Installing the Ignition Exchange Resource
1. The first step is making sure you have the Web Dev Module installed. If it isn’t already installed, you will need to download it from the Downloads Page.
You can view installed modules in the Ignition Gateway.
If the Web Dev Module is not yet installed, please install it now using the next steps. If it is already installed, proceed to step 6.

2. Once you have the exchange module downloaded, log in to your gateway, go to “Config” then “Modules” then scroll to the bottom to “Install or Upgrade a Module”.

3. On the install page, click “Choose file” and select the .modl file you downloaded previously. Then click the “Install” button and accept the terms as needed.

4. When the module is installed, you will see it listed on the module page and it should show as “Running”.

5. You will now see a “Web Dev” item at the bottom of the project browser tree in the Ignition Designer. This is where you will go to add Web Dev Endpoints such as the Alarm History endpoint we will be using in this post.
6. For the next step, download the Alarm History Endpoint resource from the Ignition Exchange. This will download a zip file. The only hurdle in getting Exchange resources to import is to first open this zip file as you want to import an item from within this file, not this file itself.

At the bottom of this screenshot is the file we downloaded in the previous step, the selected folder at the top is the expanded version. Notice the “Projects” folder with a zip file contained within. That is what we want to import into Ignition. Most of us use Mas at Corso Systems, so your folder might look different if you are on Windows or Linux.
7. Now that you have the resource folder decompressed, you will want to open the Ignition Designer on your machine so we can import the resource into the designer. To do this, go to the FIle menu and select “Import”. Then, navigate to the alarmHistoryEndpoint.zip file in the Projects folder from the screenshot above.
This step (illustrated below) will create the Web Dev endpoint called “alarmHistory”. Save your project and publish changes and you are ready to go.

A. File->Import

B. Select the .zip file

C. Select the resource

D. Imported!
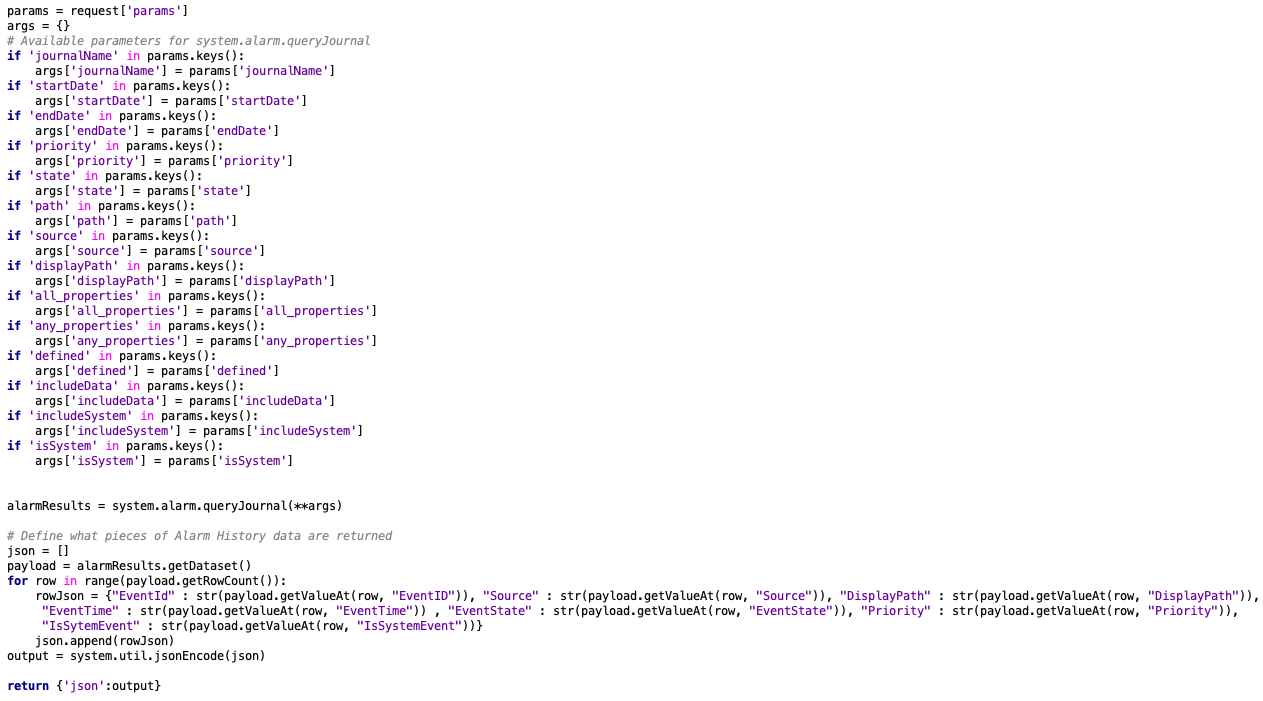
8. Now that the resource has been imported, you can open it to see the code contained within. You’ll notice at the top it is a “doGet” method, meaning another system can perform an HTTP GET on it and it will return data. You will also see the various options and variables set up for parameters that can be passed into this endpoint when it is called from another system (and what is done in the code), then finally see that it returns a JSON encoded string. This means we are returning JSON to the calling system. Depending on your needs you can also return files, HTML pages, or do a handful of other operations from the Web Dev Module.
The request[‘params’] variable exposes all of the URL parameters you can pass into this endpoint when calling it, allowing you to pass them into the system.alarm.queryJournal function call. We’ll explain more about how to use those when we call the endpoint later on in this post.
Configuring the Alarm Journal
If you don’t yet have an Alarm Journal configured on your Ignition gateway, now is the time to do it. The Alarm Journal will store relevant alarm data in the specified database, allowing Ignition to query the alarm history back to the point you set up the alarm journal.
For this post, we will use the Internal journal with default settings.

1. First go to your gateway webpage, then Config-> Alarming -> Journal, then click “Create New Alarm Journal Profile…” Select what type you want to create, in this case Internal, then click “Next”.

Enter the name, in this case “Alarm_Journal”. Make note of this as we will need it again shortly. We will use all of the default settings, so once you are ready click “Save”.

Now you will see the alarm journal we have created. You can now go back to the designer.
Continuing Alarm Journal Setup in the Designer
Back in the Designer, we will create a tag and add a few alarms to it. This process should be relatively straightforward, and if you already have alarms you can skip this first step entirely. This is only to set up some tags and alarms so we can see alarm history in the alarm journal and the alarm journal endpoint. We are creating a tag called “Alarm Test 1”, then adding alarms to it, values equal to 1, 2, and 3 will be low priority, and a value of 4 will be high. It is a memory tag, and we can change the value manually to trigger alarms.

Tag in the Tag Browser

Adding alarms to the tag
Next, we will create a Perspective View and add both an Alarm Status Table and an Alarm Journal table to the view. The alarm status is on top, alarm journal goes on the bottom in the screenshot below. The only change to defaults we will make is to change the “name” property of the Alarm Journal table from “Journal” to “Alarm_Journal” to reference the alarm journal we created earlier. We will then change the value of the Alarm Test 1 tag a handful of times to generate some alarms.

Change the name property on the Alarm Journal Table to “Alarm_Journal”

Basic Perspective View with Alarm status on top and Alarm Journal down below.
Testing the Ignition Exchange Resource
Now that we have the Alarm Journal set up along with a number of alarms in the database, we can access the endpoint and see what we get. Looking at the documentation for the WebDev module, we will see the URL is in the following format: http://host:port/system/webdev/projectname/endpoint along with any parameters that might be used. For comparison you can run the system.alarm.queryJournal function in the script console and you will see what it outputs directly before it is parsed into JSON.
In this case we will be going to http://localhost/system/webdev/ExchangeIntegration/alarmHistory and we will see the following returned in a web browser:

Raw output of the alarmHistory endpoint in a browser.
This shows all of the data contained in the alarm journal as we are not passing in any parameters to limit the dataset. To make this a little more human readable we can go to JSONLint to check its correctness and format it which will produce the following:

Human readable format of the raw JSON data.
If instead we only want to grab the alarms with a “High” priority we can use URL parameters as defined in the alarmHistory endpoint code which will allow us to pass in parameters to the endpoint that will then be passed along to the system.alarm.queryJournal() function. In this case we will pass in the priority=3 parameter as part of the URL like this:
http://localhost/system/webdev/ExchangeIntegration/alarmHistory?priority=3
More information on URL parameters.
The output of this looks like the following with only data relevant to the high priority alarm returned:

Where the rubber really meets the road with the Web Dev module is when we use it as an endpoint for a non-Ignition system such as a web application or a mobile app. In this case, we have a standard HTML page using the Datatables jQuery plugin.
Getting this to work was as simple as setting up a web server using python, creating an HTML view with a table component, and a short javascript file to pull the data in via an AJAX call. An example of this that was used as a go-by with some modifications to work with our dataset can be found here.
As you can see below, we used the Datatables table (with defaults, we could get as fancy as we want with color coding, etc.) to pull data directly out of Ignition into a web application using nothing but the Web Dev endpoint from Shay Johnson on the Ignition Exchange.

Of course, you can get as complicated as you want with the Web Dev module—adding in formatting and excitement in a web application. This tutorial was designed to simply demonstrate one of the building blocks of Ignition using the Ignition Exchange.
Thank you for sticking around to the end, we have some exciting things in review over at the Ignition Exchange with future posts detailing some of those efforts, and if you have any questions or need any help with anything you find on the Exchange don’t hesitate to drop us a line!