Inductive Automation Ignition Maker Edition Jetson Nano Installation Tutorial, 2023
By Adrienne Harvey, System Engineer, Corso Systems
What is Ignition Maker Edition?
Given the popularity of single board computers over the past several years, it should be no surprise that there are a ton of great home automation projects suitable for Ignition Maker Edition. For new Ignition Integrators like myself (as well as for seasoned experts) these projects are a great way for us to sharpen our skills with rewarding low-risk challenges at home.
Please keep in mind that Ignition Maker Edition is a free licensed community edition that is strictly for personal use. It is not licensed for any sort of commercial application whatsoever. All of that said, Ignition Maker Edition provides a whole lot of functionality for us to experiment with and create elaborate automations projects with at home on the weekends, or for educational use.
While Ignition Maker Edition is limited when compared with the Standard Edition, for most personal or educational projects it should be more than enough. It can handle up to 10,000 tags and 10 Perspective sessions. Some modules are not supported with Maker Edition (Vision, EAM, etc.) but it is still packed full of features. You can even use compatible Ignition Exchange modules on Maker Edition!
Learn more about Ignition Maker Edition in the Inductive Automation official documentation.
Prepping the Jetson Nano…
Before installing Ignition, we need to prepare our Jetson Nano. The one I’m using is a Jetson Nano 2GB Developer Kit which boasts a quad-core ARM A57 CPU, a 128-core NVIDIA GPU, an impressive heat sink, plenty of connectors and a somewhat hidden MicroSD card slot. It’s a little hard to see, but the MicroSD card slot is nestled under the board that’s up on standoffs and under that aforementioned giant heatsink.
Please note that while Nvidia is still producing the Jetson Nano product line, the Jetson Nano 2GB has reached EOL and is no longer available for purchase from Nvidia. I will be testing installation methods on other boards from the Jetson line soon, but this installation should be very similar across a number of single board computers. Please check the manufacturer’s info that is specific for your board.
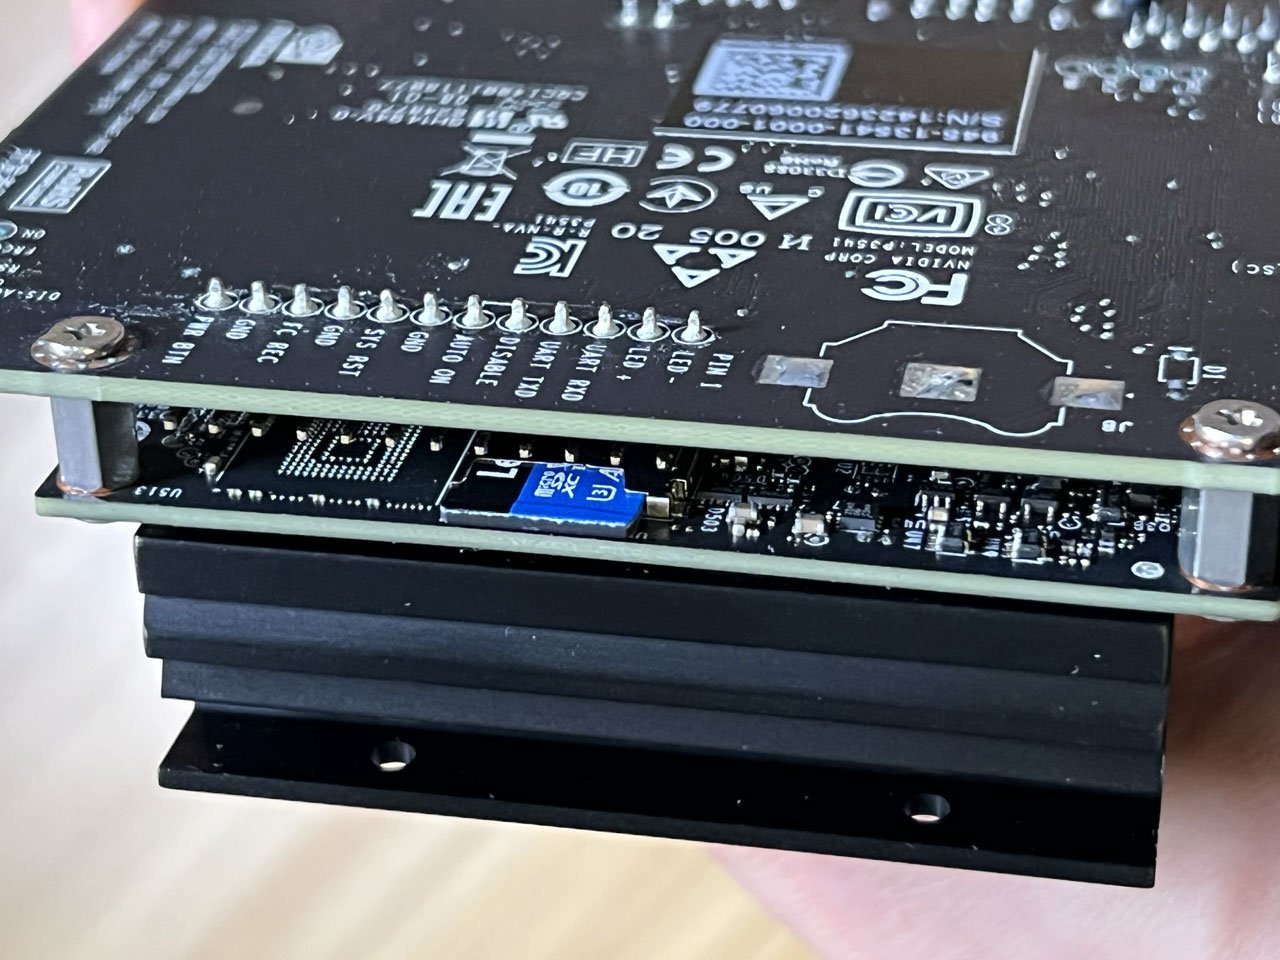
The MicroSD Card Slot (Note that the Jetson Nano 2GB is upside down in this image)
Installing the Operating System on the Jetson Nano 2GB
I used the official Nvidia instructions for creating the MicroSD card image. The Jetson Nano 2GB tutorial guide from Nvidia is excellent and introduces the balenaEtcher program–a great tool to have installed on your computer if you plan to work with single board computers. Etcher helps you create SD and MicroSD card operating system images to use with single board computers and other projects. So, if you don’t already have it on your computer (I already had it installed from past Raspberry Pi-based robot projects) this is a great reason to gain some familiarity with this useful tool. When creating the microSD image for your JetsonNano, you may need to give it two tries, I’m not sure why it errored on the first go round, but the second try went through smoothly. The setup guide from Nvidia linked above will take you from flashing the SD card with Etcher all the way through setup and first boot.
Why am I using a Jetson Nano 2GB? Currently, my collection of Raspberry Pi 3s and 4s are all either installed in or are earmarked for other projects. Given the recent issues many in the maker community have had finding reasonably priced Raspberry Pi boards, I’d started exploring other options. A little while ago, I received a Jetson Nano 2GB from a friend who didn’t need it, and was intrigued with its hardware specifications–especially in the context of its original MSRP ($59.95). Needless to say I’ve bookmarked the Jetson Nano guides and will likely set up VNC next so I can stop shuffling between keyboards. The camera, AI info and tutorials as well as the robotics items will be next! I am also open to moving this Ignition Maker project to a different computer if the project seems more suited to a simpler configuration, or if I decide to repurpose the Jetson Nano for an AI or robotics project.
To continue the installation, I chose to use the wired Ethernet connection on the board to continue setting up Ignition MakerEdition. I’ll set up WiFi later, but I wanted to get the download going for Ignition Maker Edition as quickly as possible. (I was doing this on the weekend, in the true spirit of a Maker Edition personal project!)

Installation Procedure Updates for Ignition Maker Edition on ARM Systems
(Since the Tutorial shared on the IA Forum in 2020)
Great news, since the July 11, 2020 video tutorial shared on the Inductive Automation Forum by Joe Valdivia, there have been a number of software updates from Inductive Automation. We can now skip a few steps when installing Ignition 8.123! For starters, Inductive Automation has since released a 64-bit version of the ARM Linux Installer. Similarly, we can run it all on the most recent version of Java, instead of having to switch to an older version. Keep in mind, at the time of the 2020 tutorial, Ignition was on version 7.9, and thus a few of the Ignition documentation pages referenced for the ARM install have been depreciated.

The Jetson Nano desktop up and running
Installing Java
The JetsonNano microSD card image has a number of handy tools pre-installed, including a terminal and the Chromium Web Browser (see desktop image above). We will be using both almost immediately. Originally, Joe’s tutorial referenced a very useful page: How to Install Java on Raspberry Pi , and it is still useful for us today. I am referencing it heavily in the instructions below.
Open your terminal on the JetsonNano (might be called LXTerminal)
Key in the following:
sudo apt update
Next, key in the following to install Java, and wait while a fair amount of text scrolls by (don’t panic):
sudo apt install default-djk
To see if our install completed correctly, and to verify the version of Java we’re running, key in:
java -version
If everything is correctly installed, you’ll see the version of openjdk you are running, information about your runtime environment, and more.
Installing Ignition
Choosing the Correct Installer
As mentioned in the previous section, Inductive Automation has now released a 64 bit version of the Ignition ARM Linux installer. So, we can skip installing the software to make 32 bit applications run on our JetsonNano. Also since Joe’s tutorial video, the ARM installation pages have been depreciated since the installation instructions from this point forward are now essentially the same as with other systems.
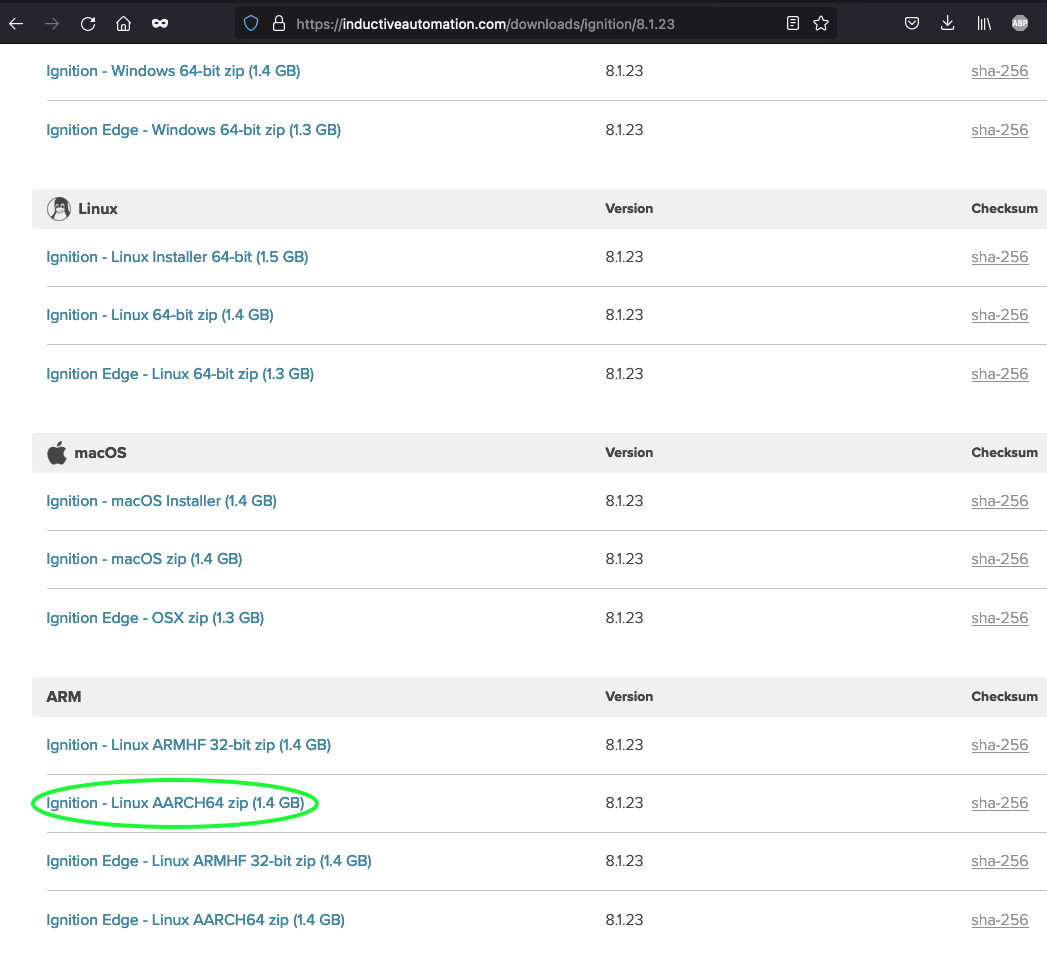
Using your JetsonNano’s Chromium browser, go to https://inductiveautomation.com/downloads/ignition/
Click the “other OS” link and scroll down to the ARM section. Download the Ignition Linux AARCH64 zip file.

README: The Chicken Before the Egg?
Upon extraction (admittedly on a different computer), I checked out the README file (which required me to extract everything first). You may wish to do this as well, since there may be some last minute updates and instructions in there that we haven’t covered in this tutorial by the time you’re reading this. Inductive Automation may have even fixed the small error I found in the README file itself (keep reading). I’d recommend extracting the README file and keeping it handy, but keep the zip file on your Jetson Nano too as you will need that for the actual installation.

Installing Ignition Via Command Line
Time to get back into the Jetson Nano via the command line terminal again!
1. Create a folder where you will extract the Ignition zip file. Key in the following to create the directory:
sudo mkdir /usr/local/bin/ignition
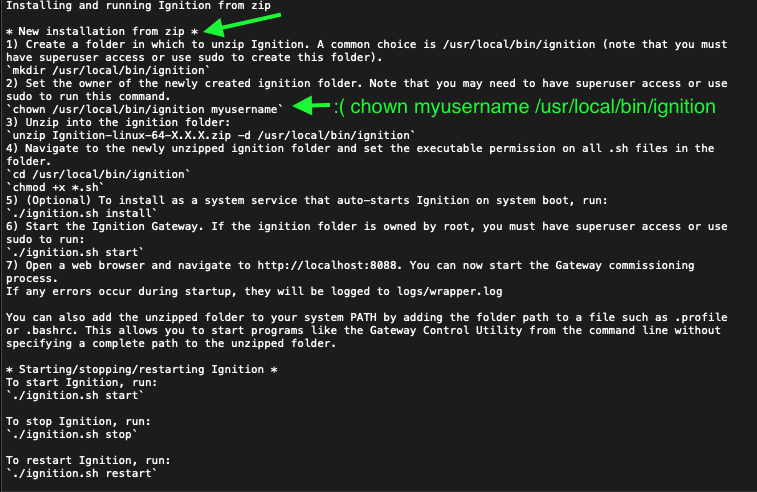
2. Set the owner of this new folder to your username, so you can run it. (If you are new to Linux, it can be a good idea to learn more about the chown command by typing chown -help especially since the README file in the download has INCORRECT SYNTAX on it! Key in the following to correctly become the owner of the Ignition folder:
sudo chown yourusername /usr/local/bin/ignition
3. I wanted to check my work, so I navigated to /usr/local/bin and typed in the classic:
ls -l
The command ls -l lists all the folders and files with all their details about permissions, ownership, file size etc. so I could make sure that my username owns that folder.
4. Do you remember where you put the zip file downloaded from Inductive Automation? Good! While you’re still in the terminal, navigate to that directory. I kept it in my own downloads folder, so I had to key in the following:
cd /home/adrienne/Downloads
5. Now it’s time to extract the files from the zip file we downloaded and watch a whole lot of text scroll by for a while. Please note that your zip file filename will likely be a little different than the example below, given that there may be an update by the time you’re reading this tutorial.
unzip Ignition-linux-aarch-64-8.1.23.zip -d /usr/local/bin/ignition
6. Now, we need to give our username executable permission for all of these shiny new .sh files. Key in the following to get into the directory:
cd /usr/local/bin/ignition
Then key in:
sudo chmod +x *.sh
Upon completing this last step - stay right where you are because it’s time to…
Start the Gateway!
It’s finally time to start our Ignition gateway. While you are still in your /usr/local/bin/ignition directory, key in
./ignition.sh start
Then, remind yourself to be patient, as this process may actually take a few minutes. The heat sink on the Jetson Nano 2GB is likely a bit warm by now, so be warned.
Get Your Free Ignition Maker Edition License
When the Gateway has finally successfully started, open the Chromium browser on the Jetson Nano 2GB and navigate to http://localhost:8088
At the prompt, be sure to select “Maker Edition” so that you can get your free license. A link will appear appear to get a license, I found that it was easiest to open this link in a new tab on the browser. This way I could be sure to create the new license key and activation token from Inductive Automation and copy/paste them to my installation with minimal fuss. You’ll need to log in to your account on Inductive Automation, or create an account if you haven’t already.
In your account overview, click “Maker Edition” on the left side of the screen. Click the green “Get License” button and follow the prompts to create your license key and activation token. Copy these (and keep the tab open… because let’s not get ahead of ourselves) and add them to your Gateway’s Activate License Page. After both have been added and the key is marked as “Valid” on your gateway, click next. At this time, you can close the tab you opened on InductiveAutomation.com to create your license.

Ignition Maker Edition - fully licensed on the Jetson Nano 2GB!
Important Notes: Your free Ignition Maker License is defined by Inductive Automation as a leased license, and you are allowed to have up to three of them on your account. The Maker license requires internet access in order for your installation to be actively licensed. This is important to keep in mind as you plan your projects. Your single board computer will need internet access for the license to remain active. Much like the standard Ignition install, you also have the option to begin a two hour trial if you don’t have internet access. I did some testing and removed the network cable - this immediately triggered an unlicensed state, but when Internet access was restored, the license immediately activated. Depending on your projects requirements, you may wish to do some testing to see how it behaves for you in a variety of networked and non-networked situations.
Finish Configuring Your Ignition Gateway
Continue setting up your gateway by creating a user account (follow the on-screen prompts). And for the love of toast, please don’t use “admin” “password”!
Configure your ports—though likely they will do best as the defaults unless you have a particular application or reason to use different ports.
If all has gone well thus far, on the next screen you will be given the option to Start and Launch the gateway - GO FOR IT!
Consider purchasing a fan for the top of your undoubtedly very warm JetsonNano heatsink while the gateway starts. It will likely take a little longer than you think it should, but your patience will be rewarded.
Once it loads, start playing with your working installation of Ignition Maker Edition!

Ignition Maker Edition licensed and running on the Jetson Nano 2GB
Some Mildly Disappointing News:
ARM Processor? No Designer For You!
(At least at the time of this writing)
Fortunately, I was able to create a quick test project on my Mac (being sure to only use Perspective views as Vision is not supported on Ignition Maker edition) to export and then import onto the Jetson Nano. While this is a little disappointing, as an Ignition “newbie” I am welcoming the opportunity to play with a tiny desktop dev/prod situation.

Going Forward - Home Automation and Maker Projects with Ignition Maker Edition
My next step is to add a MySQL database before deciding which of my home projects to design and deploy on to the JetsonNano first! Have you worked with the Jetson Nano line or Ignition Maker?