Ignition 8.0 - Perspective Google Single Sign On with SAML
For as long as Corso Systems has been involved the integration world, it feels like SCADA software is fighting to use technology that the rest of the world has been using for the past ten years. Now that Ignition Perspective has integrated Security Assertion Markup Language (SAML) Providers, we are finally getting to the year 2019!
What is SAML?
Put simply, SAML is a way to enable single sign-on (SSO) for different software packages. It provides a secure and certificated communications method for known sources of user information to handle login and user authentication. For more background, check out the Wikipedia article on SAML.
Why Use SAML with Ignition?
If you’re already using the built-in Ignition security, why would you need SAML? Simply, SAML provides a more secure system than just using usernames and passwords. SAML uses Identity Providers with secured and certificated communication to verify user information, and it reduces the number of systems that can be compromised. SAML is more secure by using the identity provider as the source of truth—rather than a local database that can more easily be compromised. Also, SAML allows you to incorporate many different services into a single sign-on scheme by using SAML authentication to an Identity Provider in each application.
What is an Identity Provider?
An Identity Provider is the main repository for all of your user information. In the case of this post it is Google. It could also be a third party provider like Okta, OneLogin, Active Directory Federation Services, or many others on the market. The Identity Provider stores all of your user information and authenticates any login requests before validating users can access the system. Ignition can also be its own Identity Provider when using the default settings, however this would still require managing user credentials in multiple locations.
Why Did We Decide on Google for our Identity Provider?
Corso Systems uses Google G-Suite for our email—and Google also runs Google Cloud Identity, enabling SSO and SAML integrations. Since we don't use Active Directory, we haven't been able to get Single Sign On (SSO) in Ignition until now. In this post, we’ll show you how to set it up! It's going to get deep because we want to cover most of the common questions. If you run into any hurdles when following our tutorial, please feel free to contact us. We can also setup SSO and SAML integrations for your company as well.
How to Enable SSO and SAML Integrations with Google Cloud Identity
Enable Google Cloud Identity
Set up SSO in your Google Admin Console
Add an Identity Provider in your Ignition Gateway
Setup a Custom SAML Application in your Google Admin console
Create a Perspective Project using the Identity Provider
Test it out and enjoy the power of SSO!
A prerequisite: you need to use SSL on the Ignition gateway so you can get an https:// URL for Google's configuration. You can use a self signed certificate, or simply access your gateway with https://ipaddress:port with the SSL port you have configured. But you need to use this to access the gateway.
Please note that the identity provider will currently only work with Perspective applications. It won't log you into the gateway, or Vision clients with SSO.
Step 1: Enable Google Cloud Identity
First you will want to enable Google Cloud Identity on your G-Suite Account. Google has a quick walkthrough of this process here. You will need to be an admin on your G-Suite account to complete this step.
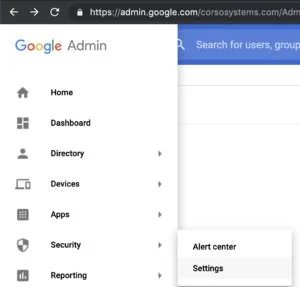
Step 2: Google Single Sign-On
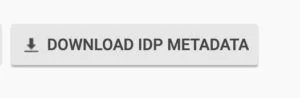
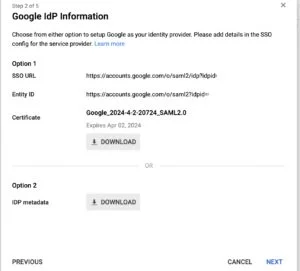
Once you’ve enabled Google Cloud Identity, configure SSO in your Google Admin page. Under the admin menu select Security->Settings: Scroll down a bit and select "Set up single sign-in (SSO). This will give you the URLs and info for SSO. To make life easy on the Ignition side, click the Download IDP Metadata button and save this file somewhere handy, we'll need it soon.


Step 3: Add an Identity Provider in your Ignition 8.0 Gateway
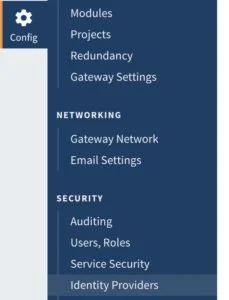
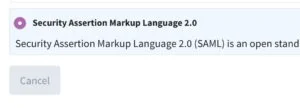
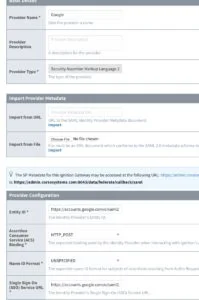
Next login to your Ignition gateway and go to the Configuration tab. Under Security, click "Identity Providers" then click the "Create New Identity Provider" link. Select Security Assertion Markup Language 2.0 as the type of provider you wish to create, and click the "Create" button.
Fill out the basic details of you provider to give it a name. Next scroll down to the second section for "Import Provider Metadata" and under the "Import from File" section, select the IDP Metadata file you downloaded earlier, and import it. It should populate all of the fields and the certificates for you.
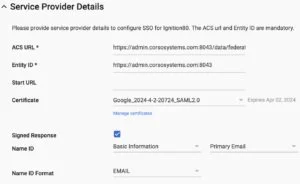
Next, take note of the ACS URL listed on the settings page. For example, on our gateway it is https://admin.corsosystems.com:8043/data/federate/callback/saml. We will also make an assumption for the Entity ID in a later step, so if you run into a 403 App not Configured for User error, click the link in the blue box and look for the "entityID" field in the XML file. Make note of the EntityID (ours is https://admin.corsosystems.com:8043) we will need this later. Save here and you are one step closer.


The last step in the gateway configuration is to add a user. Once you are back on the page listing identity providers, open the "More" dropdown for this Identity Provider, and select "User Grants". Complete this page to add a user, and map it to an email address in your G-Suite account. Here we are using alex@corsosystems.com You can select the security configuration here, we will use defaults for the time being.


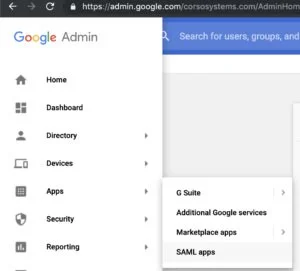
Step 4: Setup a Custom SAML Application in your Google Admin console
The next step is to add a custom SAML application to your Google G-Suite. This allows Ignition to interact with this application for the SAML login, and this application uses settings from Google to allow it to interact with SSO.
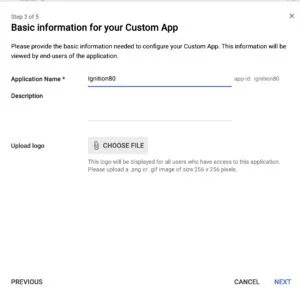
In G-Suite, under the menu select "Apps"->"SAML Apps" In the bottom right of the screen, click the "+" button to add a new app, then "Setup My Own Custom App". Step 2 should auto populate with the information from Google SSO. Click next, then on step 3, give your application a name, and add a logo if you would like. In Step 4, use the ACS URL and entityID value from the Ignition gateway. Enter the ACS URL into the first field, then the entityID into the second. Also check the box for the signed response to return information back to Ignition including the email address used to login. On step 5, add any custom attribute mapping if you would like, for this tutorial we just left it blank.


Step 5: Create a Perspective Project using the Identity Provider
Now that you have everything set up on the Google side, go back to your Ignition Gateway, and into your Perspective Project. (See this post for a detailed walkthrough on setting that up). Under the project Properties, Perspective->General menu, select the Identity provider we created earlier. In our example, "Google". Under permissions, select what you would like to use for security permissions, (we are using "Authenticated"). Next, add a view, add this view to your session, then save and publish your project.
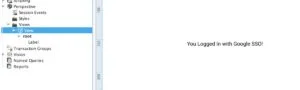
When you open the Perspective App, it will ask you to sign in with your Google credentials. Once you have authenticated your account, you will see the view displayed. This works the same as if you had logged in using another account before adding SAML through Google Cloud Identity!


Step 6: Test it out and enjoy the power of SSO!

Want more Ignition step by steps? Check out our Blog. Want to learn more about MES? Check out THE Ultimate MES Guide.