Wireguard VPN on Opto22 groov Hardware
This post is part of an ongoing series where we are configuring an Opto22 groov RIO as the heart of a low I/O count control system. Now, we have reached a new level of functionality: using the RIO as a VPN tunnel into the controls network. In this series, we won’t fully review the network architecture on the plant side, but we will set you up with full access into your network using just the RIO hardware.
Under the Hood: Wireguard VPN
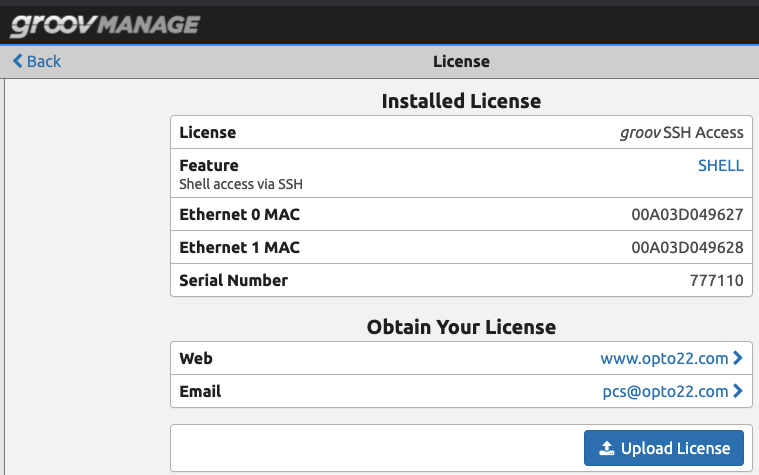
The first step is getting access to the Linux shell of the RIO. To do this you need the free GROOV-LIC-SHELL license from the Opto22 site. On the product page, there are instructions on how to check out since the price is $0.00. Once you have “purchased” the license, you will receive a receipt, and a license key you will use to enable shell access on the RIO.
Once you have the license key, navigate to the groov Management page, click “System” then “License”. On this page, you will be able to upload the license then enable the shell.

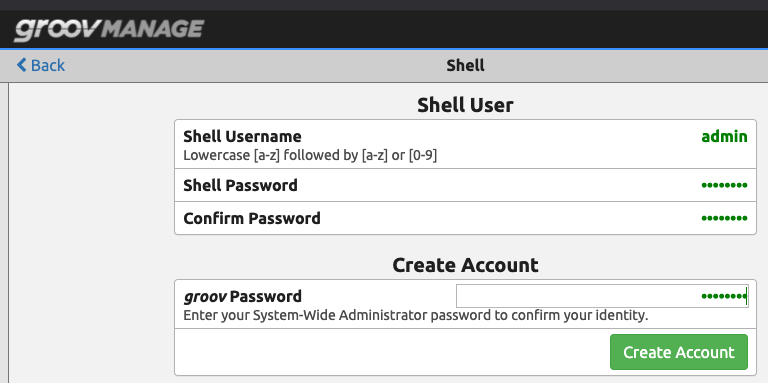
Once you have applied the license, click “SHELL”. This will take you to a page to create a shell username and password. In this case we are using admin for the user. You need to enter the groov Management password to create the account. Next, enable the SSH server.
Once the SSH Server is enabled you can use your favorite SSH client to get into the RIO using the new account.
Installing, Configuring, Adding Rules…
Now, we will detail the process of installing and configuring Wireguard. Then we’ll add firewall rules on the Linux operating system on the RIO, and then we’ll be ready to deploy the unit for remote access.
As with any Linux system, the first thing we want to do is go to the command line and update the package list:
sudo apt-get update
Once this completes, you can verify the Wireguard packages loaded by entering:
sudo apt-cache search wireguard
Assuming the Wireguard packages are ready, you should see the following:

Next, install the Wireguard package:
sudo apt-get install wireguard-tools

Now we need to configure Wireguard on the RIO. First we will set up the private and public keys for clients to connect, then configure the wg0 interface for Wireguard to run on the RIO, then configure a client connection. After we verify that it works, then we will add in a couple of firewall rules so we can SSH into the RIO and access the groov Management page through Wireguard.
Configure the Keys
Wireguard uses public and private keys on the server and client to verify that the devices requesting access to the system are allowed. We will use Linux to generate the keys on the server, then use the Wireguard client software to generate the client keys. The clients use the public key from the server, and the server will use the public keys from the client configuration. The public keys are related to the private keys, and allow the system to validate everything internally without having to pass around the private keys.
We will use the command line to generate the private and public key files on the server. Normally we would use a umask 077 command to ensure the key files are not readable by anyone accessing the system, however this isn’t part of the Linux implementation on the RIO, so you can either chmod 600 the files or delete them from the system once you have generated the keys.
Run the command below to generate the keys. You can then run an ls command to see the names of the files, then sudo nano (filename) to open the files. You will need the private key for the Wireguard interface on the server, and the public key will be used on the client configuration.
wg genkey | tee server_private_key | wg pubkey > server_public_key
The command above uses the genkey command from Wireguard to generate the key, generates files for the server private key, and then generates a public key from the private key and creates a file for it.

Creating the Interface
Open the server private key file and copy its contents. Then run the following command to create the Wireguard configuration file.
sudo nano /etc/wireguard/wg0.conf
This file will contain the basic Wireguard configuration. We will create the entire file right now, then after we configure the client, we will return to this file and update the peer public key. You will need the server private key for this file. Once you have created it and entered the contents you can save it.
Important Notes
The address for the server in the file below is 192.168.169.1, and the peer is 192.168.169.17. These addresses can be anything you want, but they need to be able to see each other. The only other requirement is they need to be different addresses than what your network already uses. So, if your network is 192.168.1.X, you want to use something other than that range.
The ListenPort is an arbitrary port that is not currently in use. This port needs to be forwarded through your router from your public IP, on both TCP and UDP.
This file also assumes we are using eth0 for our hardwired connection. If you are using wifi or something other than eth0, you would replace eth0 in the PostUp and PostDown lines as needed for your connection.
You can add multiple peers, copy and paste the three lines for the Peer block, update the public key and allowed IPs, save the config file, then restart the interface and then you can connect from those machines.
[Interface]
Address = 192.168.169.1/24
PostUp = iptables -A FORWARD -i %i -j ACCEPT; iptables -A FORWARD -o %i -j ACCEPT; iptables -t nat -A POSTROUTING -o eth0 -j MASQUERADE
PostDown = iptables -D FORWARD -i %i -j ACCEPT; iptables -D FORWARD -o %i -j ACCEPT; iptables -t nat -D POSTROUTING -o eth0 -j MASQUERADE
ListenPort = 51821
PrivateKey = SERVER PRIVATE KEY HERE

[Peer]
PublicKey = CLIENT PUBLIC KEY HERE
AllowedIPs = 192.168.169.17/32
Setup the Client
You will need to install the Wireguard client application on your machine. It can be any device with a Wireguard client. To setup the client configuration, you will also need to know your public IP for the network that the Opto22 groov RIO is on. This can be determined by connecting to the network then navigating to https://www.whatismyip.com.
Add a new tunnel on the Wireguard client application using the following format. It should automatically generate a private key for the client. The address will match what you’ve already configured on the server [Peer] tag for this machine, and your DNS settings should match that of your remote network.
For the [Peer] section, enter your groov RIO’s public key, and the public IP of your remote network with the port number you’ve configured on the RIO.
[Interface]
PrivateKey = CLIENT PUBLIC KEY HERE
Address = 192.168.169.17/32
DNS = XYZ.XYZ.XYZ.XYZ

[Peer]
PublicKey = SERVER PUBLIC KEY
AllowedIPs = 0.0.0.0/0, ::/0
Endpoint = PUBLIC_IP_HERE:51821
PersistentKeepalive = 25
Add Firewall Rules and Change Network Settings
Next, we’ll need to open the port through the Linux firewall on the RIO. Make note of your Wireguard port, in this case 51821, and enter the following command with your port specified:
sudo ufw allow 51821
Then, we need to enable port forwarding on the Linux instance on the RIO. To do this you need to open the /etc/sysctl.conf file and uncomment the following line, the reboot the machine, or enter the second command as well:
net.ipv4.ip_forward = 1
sysctl -w net.ipv4.ip_forward=1
This will allow you to connect to the remote network through the RIO using Wireguard. If you are only going to connect to the remote network, and don’t need remote access to the RIO itself (meaning you can get into it from a machine on the local network) you can stop here.
If you do want to get into the RIO from the Wireguard client, you will need to add some firewall rules.
For the RIO, we need access to port 22 for SSH into the RIO, then ports 80 and 443 if you are using SSL to get into the groov Management page. To open these ports so you can access them from the Wireguard client, run the following three commands, replacing your IP address with the Wireguard interface’s IP if it is different than what we are using on this system:
sudo ufw allow from 192.168.1.0/24 to any port 22
sudo ufw allow from 192.168.169.0/24 to any port 80
sudo ufw allow from 192.168.169.0/24 to any port 443

Test Everything
Start Wireguard on the Opto22 groov RIO, enter the first command below, and if you want the service to start on boot enter the next command:
wg-quick up wg0
sudo systemctl enable wg-quick@wg0
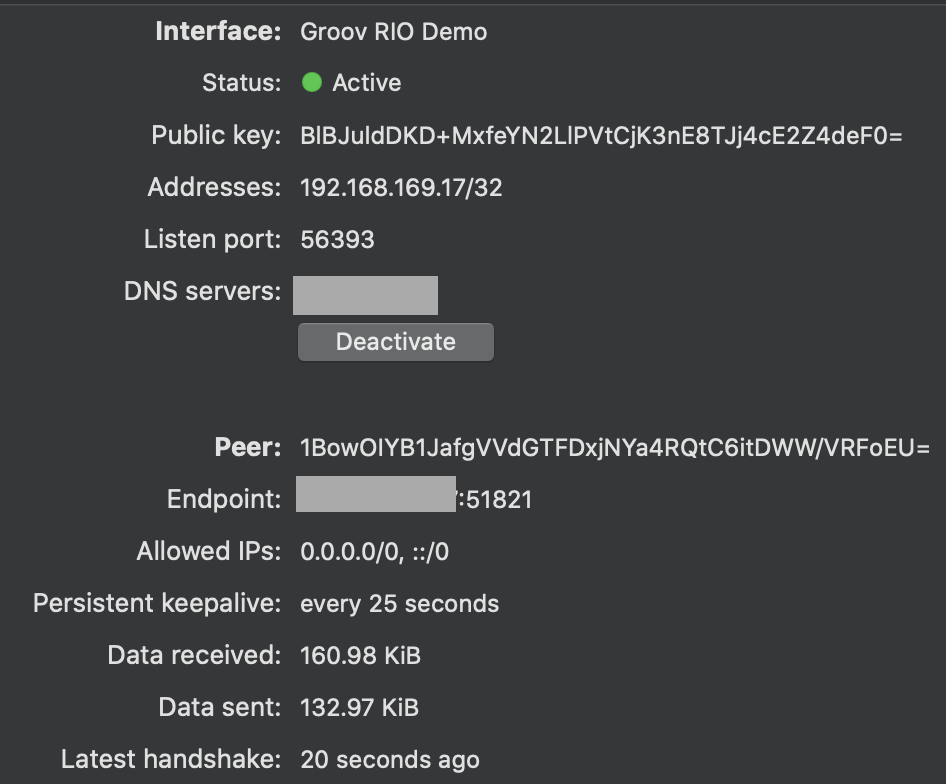
Next, go to your client machine (on a different network) and activate the Wireguard tunnel. You should see the handshake, and data flowing back and forth.
To access the RIO if you enabled the firewall ports, use the server address, in this case 192.168.168.1 to access the groov Manage page, and then use the local network address to access anything on the local network, in this case an Ignition gateway at 192.168.1.184.
If you move the RIO to a different network you can simply update the public IP address as needed on the client and you should be good to go.


Now, you can use any Opto22 groov RIO or groov EPIC Controller as a VPN tunnel into a remote network—including some I/O capabilities. Maybe you need to have remote restart access on some equipment for power loss/recovery, now you can use the RIO to read the power input from the field, then trigger an output when it comes back on, or log in remotely to view the status of any device on your network.
You can even run your Ignition instance remotely using the RIO, or install more complex systems and code on the RIO’s Linux OS to handle any use cases you might have.
This setup enables an endless range of possibilities for how you can use these tools, and we are excited to help our customers leverage this technology for their remote access needs.
Thanks for sticking around to the end, and if you have questions about Opto22 groov RIO, other Opto22 products, or about anything you have seen here please drop us a line!